- to get paul used to the rules system as this would be his second game.
- to re-ignite my gaming.
Firstly, the Army Lists.
Sean's Tactically Terrible Flounder Force ;)
"The Lucky 88th"
HQ:
- Regimental Command
Commissar Advisor "Spears" with Power sword & Plasma Pistol
Vox
Medic
Meltagun
Troops:
- Platoon Command
Commissar Advisor with Power sword and Plasma Pistol
Vox
Medic
Missile Launcher
- Infantry Squad 1
Missile Launcher
- Infantry Squad 2
Missile Launcher
- Conscripts (20)
- Heavy Weapon Squad 1 - 3x Heavy Bolters
- Heavy Weapon Squad 2 - 3x Autocannons
- Penal Legion
- Armoured Sentinal - Plasma Cannon
- Salamander Scout - hull heavy bolter
- Leman Russ Executioner - hull lascannon
- Medusa - hull heavy bolter
Pauls "TAU-Tastic Tactical Detachment" :D
Tau B'orkan Sept Rapid Response Force Tactical Combined Arms Detatchment (1214 Points)
HQ:
- Commander Firejade Shas'0 Fielding airburst fragmentation launcher plasma rifle and command and control node
- Ethereal Ai'va
Troops:
- 6 Firewarriors including Shas'vre supported by two gun drones and a markerlight
- 6 Firewarriors including Shas'vre supported by two gun drones and a markerlight
- Stealth Team with marker drone
- Shas'vre Crisis Suit fielding plasma-rifle, missile-pod and shield generator. Failsafe Detonator, Irridium armour
Fast attack:
- 1 Piranha light skimmer with disruption-pod, decoy-launcher and 2 seeker missiles
- Pathfinder team with 2 rail-rifles and shield drone mounted in devilfish equipped with 2 seeker missiles, decoy launcher, disruption pod and sensor spines
Heavy support:
- 1 Broadside Shas'vre with railguns, smart-missiles and shield generator
The Game Setup:
We did this game "by the book" rolling for scenario and deployment.
Scenario: Seize Ground
Deployment: Dawn of War
Having only 3 objctive markers, I ask John (my opponent from last weekend) to place the objectives on the board.
I win the roll off for first go, and decide that paul could have the first turn and therefore he could choose which half of the board to deploy in.
_________________________________________________________________
The Board
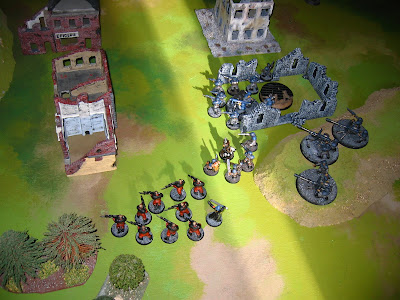
The Board, liberally spread with terrain, a small ruined town nestled in the trees.


 _________________________________________________________________
Paul starts off setting up his 2 troops and 1 HQ, taking the middle objective (nestled in the trees to the right of the picture)

I decided to split my forces between the two unclaimed objectives, an infantry squad holds the objective to the right, covered by the 3 autocannons and supported by the Regimental Command and Penal Legionnaires.
 And for the left objective, i decided to march the conscripts (mainly for comedic effect :D) supported by the heavy bolters, the platoon command, with a sneaky infantry squad further left behind the rock.
 _________________________________________________________________
The Objectives
The famous dead guardsman (in my half of the table, to the left)
 The TAU hold imperial hostages (centre table, in paul's half)
The (still unfinished) fuel dump is secured under a mob of men. (my right, my half of the table)
 _________________________________________________________________
Turn 1:
Commander Firejade Shas'o surveys the battlefield from atop the "K-wolf" building (apparently). The remainder of Paul's force emerges at once as per the dawn of war scenario.

Under the cover of darkness the conscripts advance towards the objective. The medusa enters play.

The executioner enters dead centre and rocks up next to some trees. The sentinal stalks towards the centre.
 _________________________________________________________________
Turn 2 (to 4)

The conscripts begin to take the inevitable deaths.

Seans Lesson for the Day: CARBINES CAUSE PINNING AAARGH!!!
 The Penal Custodian, with orders from above (Run Run Run!) kicks the penal legionnaires halfway up the board
 the sneaky medusa creeps up to the left flank, it is promptly immobilised here
 The Penal Legionnaires (psycopaths) catch the Shas'vre Crisis Suit in their sights. Tunnel Vision ensues.
 The Shas'vre accepts the challenge, leaping into combat. in turn drawing in the Regimental Command.
 The left flank is slowly being whittled away
 the penal legionnaires are slaughtered to a man, enraged by this (i don't know why- they were the scum of the imperium...), the commander commits his command squad to stick it out.
 The salamander (trying to sneakily outflank the TAU held objective) is immobilised, pointing in a nearly useless direction.
 the salamander explodes...
 A bitter Sentinal is obsessed with trying to kill the Shas'o, but failes consistantly. the Shas'o however, is enjoying destroying my platoon command in the opposing building.

Somewhere in here (and somehow) I managed to miss the, quite frankly, EPIC battle between the leman russ executioner and the tau force. after melting the entire stealth suit team in one go, the executioner then finds itself targetted by many marker lights and a seeker missile flying its way. the exectuioner is destroyed outright. - this did not make me happy.
_________________________________________________________________
Turn 5
With the conscripts all dead, the heavy bolter squad dive onto the objective - assuming the game would end here (2 objectives Imperial, 1 TAU)
 It doesn't...
_________________________________________________________________
Turn 6
Ethereal Ai'va joins the fire warriors on the TAU objective.

 _________________________________________________________________
Turn 7
(I seem to have missed this photo) the Regimental Command gives their life to kill the Shas'vre. Colonel Commissar Winters, ignoring his single wound, makes it to the TAU objective in an attempt to force them from it.
 The heavy bolter team are removed by massed TAU gunfire
 The """"Fuel Dump"""" is safely under imperial control.
 Ethereal Ai'va kills Colonel Commissar Winters, Securing the Hostages for the TAU
 _________________________________________________________________
The End
Tau 1
Imperial 1
DRAW!!
Imperial 1
DRAW!!
 _________________________________________________________________
Memorial + Awards
"The Lucky 88th"
- Regimental Command (Killed In Action - Post humous award for bravery)
- Platoon Command (Killed in Action)
- Infantry Squad 1 (Survived with honours)
- Infantry Squad 2 (Killed in action)
- Conscripts (20) (Killed in action - no suprise there then :D)
- Heavy Weapon Squad 1 - 3x Heavy Bolters (killed in action, post humous award)
- Heavy Weapon Squad 2 - 3x Autocannons (survived with an after battle ticking off for not obeying orders)
- Penal Legion (Killed in action post humous forgiveness from the emperor)
- Armoured Sentinal (survived)
- Salamander Scout (destroyed)
- Leman Russ Executioner (destroyed - most deadly)
- Medusa (Immobilised, abandoned for later recovery)
Tau B'orkan Sept Rapid Response Force Tactical Combined Arms Detatchment (1214 Points)
- Commander Firejade Shas'0 (Survived, Most deadly)
- Ethereal Ai'va (Survived with Valour)
- Firewarriors (Killed In Action)
- Firewarriors (All but Shas'vre Killed In Action)
- Stealth Team (Melted In Action)
- Shas'vre Crisis Suit (Killed in Action) (the failsafe detonator failed...)
- Piranha (1 Tank Kill, Immobilised)
- Pathfinder team (Survived with Honours, 1 Tank Kill)
- Broadside Shas'vre (Survived With Honours)
_________________________________________________________________
Things I'll take away with me from ths game.
- Movement: given enough terrain, movement can really liven up the game, outflanking is rife!
- TAU CARBINES CAUSE PINNING!!!!
- I HATE DICE - sometimes you just can't make the rolls you need, i think i failed every roll that had a pivotal effect on the game. In pauls case, sometimes you can't fail those pesky four plusses!! luck was obviously with the beginner for this game :D
- TAU vehicles with disruption pods are JAMMY especially when your opponent never fails a 4+ roll :D
And a massive thanks to John "the walking rulebook" not only did he place the objectives down, but he also stayed for the duration of the game helping paul with his VAST KNOWLEDGE of all things 40k, and providing much amusement :D
Cheers for tuning in
TSINI


