Hi guys,
Today I'm going to run down all the details from Vonwar which happened on the 15th & 16th of April.
(A while ago I know, but I've been busy with many things that got in the way of writing up this massive post)
Choosing my army
Originally I was going to run the Lucky88th, but after a bit of meddling with the list, I realised it was going to demand one hell of a dedication to get it painted ready in time. Hive Splinter Borlin on the otherhand, is much further on.
I wrote out an initial list, containing everything I own, apart from the Scythed Hierodule. I included the Malanthrope because forgeworld units are allowed.
My initial thoughts for extra units to fill out the last few hundred points were Mieotic Spores, not to be confused with Micetic spores. These are forgeworld units, giant spores that explode creating smaller spores.
After a bit of a price consideration, I realised that to field any forgeworld units, I would need to fork out for the latest forgeworld apocalypse book, so rather than do that, I removed the Malanthrope, and the thought of giant spores
Instead I went stark raving loony and bought some finecast spores and a broodlord. and a Tyrannofex...
I got to have a game with my mates a few weekends before, from this I realised I was drastically lacking Synapse to control my forces. So I Eventually settled on a winged hive tyrant to kill 3 birds with one stone, its only a single model to build and paint, its most of the extra 300 points down in one go, and its a synapse beast.
so heres the army I took!

Hive Splinter Borlin, 2300points
Hive Tyrant: Armoured Shell, 2x Scything Talons, Paroxysm, Leech Essence
Hive Tyrant: Wings, 2x Scything Talons, Psychic Scream, Leech Essence
Tyrant Guard: Scything Talons
Zoanthrope
Venomthrope
Genestealer Brood (8 models): Scything Talons, Adrenal Glands
Ripper Swarm (4 bases)
Tyranid Warrior Brood (3 models): Scything Talons, Rending Claws
Hormagaunts (20 models): Adrenal Glands
Hormagaunts (20 models): Adrenal Glands
Hormagaunts (15 models): Adrenal Glands
Ravener Brood (3 models): 2x Scything Talons
Spores (4 models)
Trygon: Adrenal Glands
Trygon Prime: Adrenal Glands, Regeneration
Tyrannofex: Fleshborer Hive, Regeneration, Cluster Spines, Dessicator Larvae
1st Game
The Deployment was odd, you could only deploy fast attack and units with the Scout USR within 18" of your table edge, the second player could deploy his fast attack and scouts anywhere outside of 18" of the enemy.
on turn 1, all Troop Units & their Dedicated Transports enter play from your table edge, on turn 2 all Elite and Heavy Support Units & their Dedicated Transports, then turn 3 all HQ & their Dedicated Transports. reserves could only be rolled for on turn 3 onwards on a 3+ as normal
drop pods however dropped in pretty much normally...
My first game was against Mike, He had a lot of Drop Pods
This was a disaster for me, I ploughed forwards hoping to grab the trees on the hill and claim a moral victory holding the "High Ground", having pretty much decided the game was lost.

They all landed very close to my table edge

I had to constantly keep hiding from the stormraven

my poor poor tyrannofex, late to the party was getting riddled

death company are crunchy!


The armoured Tyrant finds himself lost in a forest of drop pods

so to make up some quick killpoints, he attacks two of the tin cans

needless to say, I got wiped off the table. a very bad loss for me.
2nd Game
This game used "Ambassadors", these were 25mm based infantry models, which were essentially moving objectives which you "picked up" with troops
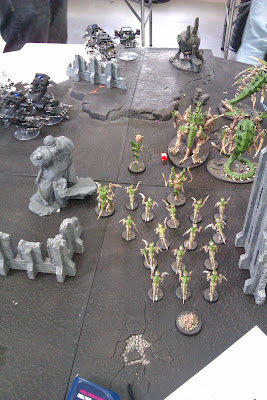
This would prove to be a bloody game, with, Nids Vs Nids
I decided, due to the positioning of the ambassadors (in the opposing corners to our deployment) to split into 2 forces, one would have 2 waves of hormagaunts, and a heavy hitting main force. the other would be the Flying Hive Tyrant, with a squad of hormagaunts, the plan being, the tyrant jumps in and causes a messy distraction while the hormagaunts run away with the ambassador (pictured below, the "brainy" hormagaunt)

the enemy deployment was pretty singular

My heavy hitting force sidle around the top, behind a spore mine wall.

the two flying tyrants get straight into a barny!

The Trygon Prime escapes a scary scatter roll of 11 which didnt quite hit the table edge!

the big monsters line up for a "Godzilla Fight!"


It's all about to kick off!

A bit one sided though!

my genestealers aren't on the table long!

The Trygon is blown to smithereens!

The godzilla fight is won! by the opposition...

3rd Game
This game was against Dave McCoy, a bit of a legend in local tourney, mainly for his 4 pint jug 'o' beer at Attack!, but also for his attrocious rolling of 1's. they aren't regular, just when he really doesn't want them. He brought his Sisters of Battle.

In this game there was a single objective, and the player with the most scoring units within 3" of the objective would gain 3 points. It was also important to get units into the enemies' deployment zone, every unit wholly within it gained you 1 point. most points won.
I pretty much lined up and launched at the objective, with monstrous flanking units to clear paths.

The two trygons eye up a blob of rhinos

A heavy lump surrounded by the hordes of scythes.


The first rhino bites the dust, leaving a smoking crater of sisters

3 angry penitent engines threaten my gribblies with many many flamers

I needed to silence those pesky missile tanks

the second rhino empties

a penitent pops

A strange sight, as the hormagaunts dive into cover around the objective, whilst the imperials stand outside shooting

the flyrant threatens an exorcist

cheekily the raveners and rippers pop up in the enemy deployment zone

The sisters take cover while shooting the trygons

The nids are surrounded!


I managed to pull a win from this game, with 2 units on the objecive, and 1 unit in the enemy deployment zone!
4th Game
James Wickes is a cool character, he loves him some blood angel tanks!
You join the pictures a couple of turns in. the deployment was spearhead. This mission was meant to start in nightfight, with a 4+ continue for turn 2, and auto daylight on turn 3. but we forgot...
the mission objective was a modified kill points, with more expensive units giving more kill points
Today I'm going to run down all the details from Vonwar which happened on the 15th & 16th of April.
(A while ago I know, but I've been busy with many things that got in the way of writing up this massive post)
Choosing my army
Originally I was going to run the Lucky88th, but after a bit of meddling with the list, I realised it was going to demand one hell of a dedication to get it painted ready in time. Hive Splinter Borlin on the otherhand, is much further on.
I wrote out an initial list, containing everything I own, apart from the Scythed Hierodule. I included the Malanthrope because forgeworld units are allowed.
My initial thoughts for extra units to fill out the last few hundred points were Mieotic Spores, not to be confused with Micetic spores. These are forgeworld units, giant spores that explode creating smaller spores.
After a bit of a price consideration, I realised that to field any forgeworld units, I would need to fork out for the latest forgeworld apocalypse book, so rather than do that, I removed the Malanthrope, and the thought of giant spores
Instead I went stark raving loony and bought some finecast spores and a broodlord. and a Tyrannofex...
I got to have a game with my mates a few weekends before, from this I realised I was drastically lacking Synapse to control my forces. So I Eventually settled on a winged hive tyrant to kill 3 birds with one stone, its only a single model to build and paint, its most of the extra 300 points down in one go, and its a synapse beast.
so heres the army I took!

Hive Splinter Borlin, 2300points
Hive Tyrant: Armoured Shell, 2x Scything Talons, Paroxysm, Leech Essence
Hive Tyrant: Wings, 2x Scything Talons, Psychic Scream, Leech Essence
Tyrant Guard: Scything Talons
Zoanthrope
Venomthrope
Genestealer Brood (8 models): Scything Talons, Adrenal Glands
Ripper Swarm (4 bases)
Tyranid Warrior Brood (3 models): Scything Talons, Rending Claws
Hormagaunts (20 models): Adrenal Glands
Hormagaunts (20 models): Adrenal Glands
Hormagaunts (15 models): Adrenal Glands
Ravener Brood (3 models): 2x Scything Talons
Spores (4 models)
Trygon: Adrenal Glands
Trygon Prime: Adrenal Glands, Regeneration
Tyrannofex: Fleshborer Hive, Regeneration, Cluster Spines, Dessicator Larvae
1st Game
The Deployment was odd, you could only deploy fast attack and units with the Scout USR within 18" of your table edge, the second player could deploy his fast attack and scouts anywhere outside of 18" of the enemy.
on turn 1, all Troop Units & their Dedicated Transports enter play from your table edge, on turn 2 all Elite and Heavy Support Units & their Dedicated Transports, then turn 3 all HQ & their Dedicated Transports. reserves could only be rolled for on turn 3 onwards on a 3+ as normal
drop pods however dropped in pretty much normally...
My first game was against Mike, He had a lot of Drop Pods
This was a disaster for me, I ploughed forwards hoping to grab the trees on the hill and claim a moral victory holding the "High Ground", having pretty much decided the game was lost.

They all landed very close to my table edge

I had to constantly keep hiding from the stormraven

my poor poor tyrannofex, late to the party was getting riddled

death company are crunchy!


The armoured Tyrant finds himself lost in a forest of drop pods

so to make up some quick killpoints, he attacks two of the tin cans

needless to say, I got wiped off the table. a very bad loss for me.
2nd Game
This game used "Ambassadors", these were 25mm based infantry models, which were essentially moving objectives which you "picked up" with troops
This would prove to be a bloody game, with, Nids Vs Nids
I decided, due to the positioning of the ambassadors (in the opposing corners to our deployment) to split into 2 forces, one would have 2 waves of hormagaunts, and a heavy hitting main force. the other would be the Flying Hive Tyrant, with a squad of hormagaunts, the plan being, the tyrant jumps in and causes a messy distraction while the hormagaunts run away with the ambassador (pictured below, the "brainy" hormagaunt)

the enemy deployment was pretty singular

My heavy hitting force sidle around the top, behind a spore mine wall.

the two flying tyrants get straight into a barny!

The Trygon Prime escapes a scary scatter roll of 11 which didnt quite hit the table edge!

the big monsters line up for a "Godzilla Fight!"


It's all about to kick off!

A bit one sided though!

my genestealers aren't on the table long!

The Trygon is blown to smithereens!

The godzilla fight is won! by the opposition...

3rd Game
This game was against Dave McCoy, a bit of a legend in local tourney, mainly for his 4 pint jug 'o' beer at Attack!, but also for his attrocious rolling of 1's. they aren't regular, just when he really doesn't want them. He brought his Sisters of Battle.

In this game there was a single objective, and the player with the most scoring units within 3" of the objective would gain 3 points. It was also important to get units into the enemies' deployment zone, every unit wholly within it gained you 1 point. most points won.
I pretty much lined up and launched at the objective, with monstrous flanking units to clear paths.

The two trygons eye up a blob of rhinos

A heavy lump surrounded by the hordes of scythes.


The first rhino bites the dust, leaving a smoking crater of sisters

3 angry penitent engines threaten my gribblies with many many flamers

I needed to silence those pesky missile tanks

the second rhino empties

a penitent pops

A strange sight, as the hormagaunts dive into cover around the objective, whilst the imperials stand outside shooting

the flyrant threatens an exorcist

cheekily the raveners and rippers pop up in the enemy deployment zone

The sisters take cover while shooting the trygons

The nids are surrounded!


I managed to pull a win from this game, with 2 units on the objecive, and 1 unit in the enemy deployment zone!
4th Game
James Wickes is a cool character, he loves him some blood angel tanks!
You join the pictures a couple of turns in. the deployment was spearhead. This mission was meant to start in nightfight, with a 4+ continue for turn 2, and auto daylight on turn 3. but we forgot...
the mission objective was a modified kill points, with more expensive units giving more kill points
Excluding dedicated transports in unit cost (count as separate unit)
Unit Cost 350+ 4 KP
Cost 250 to 349 points (inclusive) 3 KP
Cost 150 to 249 points (inclusive) 2 KP
On my right flank, I sent some hormagaunts, raveners and warriors, followed by the zoanthrope to deal with a couple of baals

A mighty core of monsters strode down the middle of the board, with a hormagaunt unit with flyrant flank left, to hide mainly...


Some jump packers leapt into action

The Trygon accepts the challenge!

My unit is shredded by the two Baals

The flyrant leaps out of the building, with the armoured tyrant changing course

one baal is destroyed, the other missing it's turret


A marine squad dives into the reddish bunker on the left of the picture below

The armoured Tyrant smells fear!

He deals with the razorback, while the flyrant assaults the tank by the bunker

The Tyrannofex begins to headbutt jump troopers

Things explode all over the place

I managed to pull out a resounding win, with James barely killing anything
5th Game
This game was a toughy, it was objectives, but different objectives were worth different amounts.
my opponent, ran ravenwing. to be honest, I have no real experience fighting bikers...

I pretty much just ran across the table to my doom


Caught up in this battle (it was closely fought) I neglected to take any more pictures during the game it would seem, but the final turn was tense. In my last turn (I was going second) I managed to catch my opponent off guard with a super long run by my hormagaunts to claim the centre objective, this had the effect of drawing the game, but a huge! miscalculation on my part meant I also assaulted the venomthrope into a squad of troop bikers, and when it died, they managed to consolidate a fraction of an inch into the centre objective claiming zone. so I lost by a fraction of an inch. I learnt that lesson solidly :D
So all in all this was a great lesson in how to "Play the Game" objective wise.
I've played another Vonwar game recently, I haven't taken many photos of that one, just a couple to show off some armies, which I will post up soon.
But right now I better get back to painting Super Dungeon Explore (you will find my painting progress detailed on the right at Delve Into The Dungeon)
So until next time
Cheers
TSINI
Cost 0 to 149 points (inclusive) 1 KP
On my right flank, I sent some hormagaunts, raveners and warriors, followed by the zoanthrope to deal with a couple of baals

A mighty core of monsters strode down the middle of the board, with a hormagaunt unit with flyrant flank left, to hide mainly...


Some jump packers leapt into action

The Trygon accepts the challenge!

My unit is shredded by the two Baals

The flyrant leaps out of the building, with the armoured tyrant changing course

one baal is destroyed, the other missing it's turret


A marine squad dives into the reddish bunker on the left of the picture below

The armoured Tyrant smells fear!

He deals with the razorback, while the flyrant assaults the tank by the bunker

The Tyrannofex begins to headbutt jump troopers

Things explode all over the place

I managed to pull out a resounding win, with James barely killing anything
5th Game
This game was a toughy, it was objectives, but different objectives were worth different amounts.
my opponent, ran ravenwing. to be honest, I have no real experience fighting bikers...

I pretty much just ran across the table to my doom


So all in all this was a great lesson in how to "Play the Game" objective wise.
I've played another Vonwar game recently, I haven't taken many photos of that one, just a couple to show off some armies, which I will post up soon.
But right now I better get back to painting Super Dungeon Explore (you will find my painting progress detailed on the right at Delve Into The Dungeon)
So until next time
Cheers
TSINI